This is a short introductory article to a series of articles where I will describe how I chose the components for the bike and what problems I encountered.
I am not a bike mechanic or an expert in bicycles, so some of my judgments may be strange for professionals, I will only describe my thoughts and motives why I chose this or that part. This is the first bike that I assemble myself, and before that, I did not know anything about gravels or even about road bikes. So I had to learn all the information about road components from scratch. Something friends suggested, thanks to them!
First, I will briefly describe how I imagine a gravel bike and why I chose it. For several years now I have been attracted by the ability of road bikes to ride fast on the roads, a drop handlebar, and a rigid fork. But looking at the statistics of my rides, I realized that usually the asphalt is mixed with forest paths and primers, and these are pits, roots, dirt, small stones. Therefore, I need something more passable than a road bike.
Cyclocross or Touring?
The first is a sports unit, you can’t install a rear rack on it and, often, even fenders, that is, a minimum of comfort. Touring was my choice, to be honest. Compared to a road bike, the touring bike has a higher cross-country ability due to wider wheels (of course, not as wide as those of MTBs), a more comfortable fit, and the ability to attach racks and fenders. The only downsides are weight, as these bikes need to be reliable, and a long wheelbase, which makes it less maneuverable and therefore less fun on cross country.
I delayed a little with the decision to buy a touring, and at that time gravel bikes appeared on the scene. I see them as the middle between cyclocross and touring: lighter and more maneuverable than touring, but slightly more comfortable than cyclocross, and (though not all) there is the possibility of installing fenders and a rack. Also, a feature of gravel bikes is a wider rigid fork that allows you to install wide (like MTB) tires. Thus, the gravel bike feels great on the road and is not much inferior in the cross-country ability of MTBs, and you can also ride it on trips that do not require serious preparation.
You can read how I ordered the frame in the previous article.
Since I decided to fork out for a carbon frame, I decided that the main components will be worthy. And on secondary details, I decided to save money, because branded small things are not much superior in quality to Chinese ones, but they are much more expensive.
Important characteristic
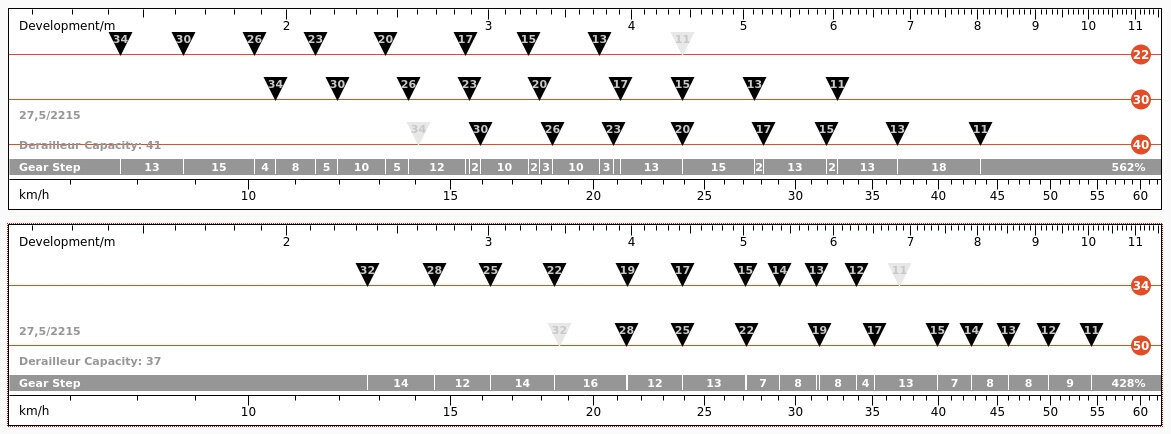
Now I have an MTB, and I’ve been taking it on my travels. More than once I had to ride in mountainous areas where there are long climbs. Imagine that you are riding for an hour (or even half a day) with the lightest gear 1×1. I want the future gravel bike to also allow me to overcome these climbs. So I need to somehow get low (powerful) gear closer to MTB low gear values. According to my calculations, the standard builds, offered by manufacturers, have a lower gear 36% heavier than in my current MTB. It seems that in such a gear it will be difficult to overcome the climbs. How I narrowed the gap, read in the next article.
Top chart is my current MTB. System 20-30-40, cassette 11-34 (9 speeds).
Bottom chart is a standard gravel kit. System 34-50, cassette 11-32 (11 speeds).
The top left black triangle in each chart represents the lightest gear. Let’s calculate in percentage the difference for the lightest gear according to the values of the upper scale (Development / m):
(1 – 1.43/2.25) * 100 = 36%


